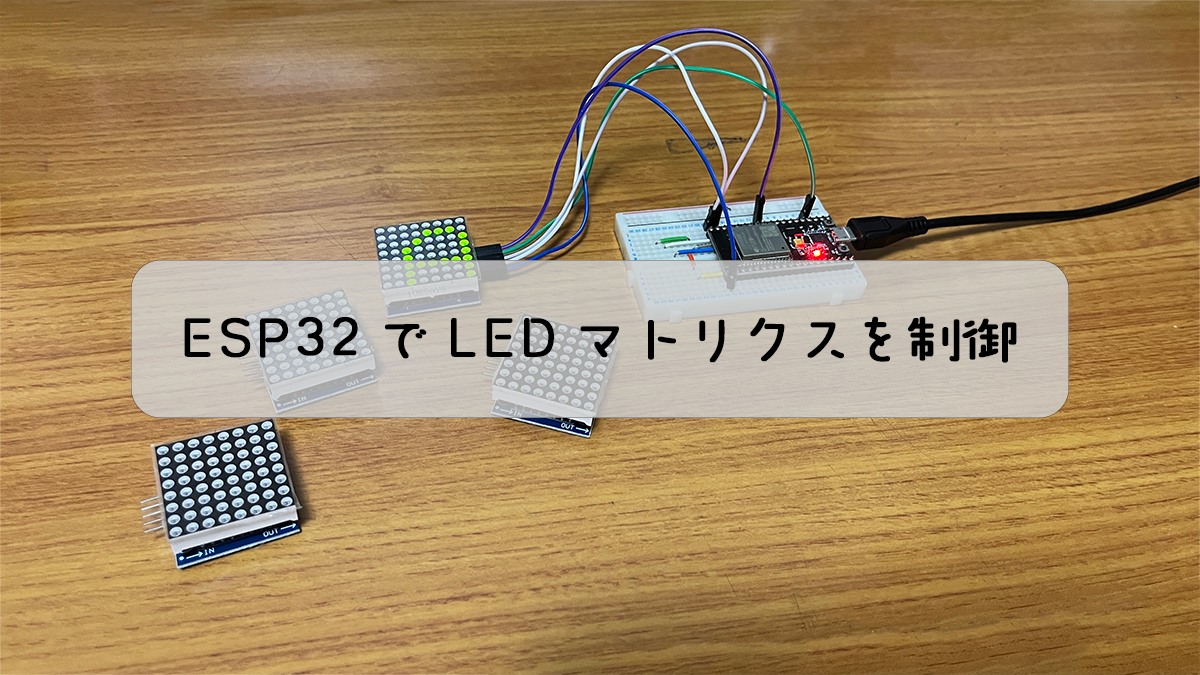
今回はESP32でLEDマトリクスを使う方法を紹介します。
完成様子がこちらです。
早速作っていきます。
必要なもの
必要なものを以下にまとめておきました。
- ESP32
- MAX7219 8×8ドットマトリックス
- ジャンプワイヤー
です。
↓おすすめの商品↓
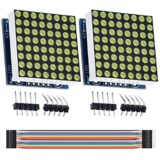
Youmile 2個 MAX7219 8x8ドットマトリックスシングルグリーンライトMCU制御LEDディスプレイモジュール、Arduino、Raspberry Pi、デュポンケーブル付き
仕様: 単一モジュールで8 x 8ドットマトリックス共通カソードを駆動可能 モジュール動作電圧:5V モジュール寸法:3.2 x 3.2 x 1.3 cm / 1.26 x 1.26 x 0.5 "(LxWxH) 4本のネジが付いた穴、直径...
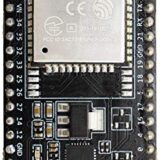
waves ESP32 DevKitC V4 ESP-WROOM-32 ESP-32 WiFi BLE
USBドライバ www.silabs.com/products/development-tools/software/usb-to-uart-bridge-vcp-drivers ※5個以上の注文はこちらをご参照ください。
回路図
以下が接続方法になります。配線を間違えないようにしてください。
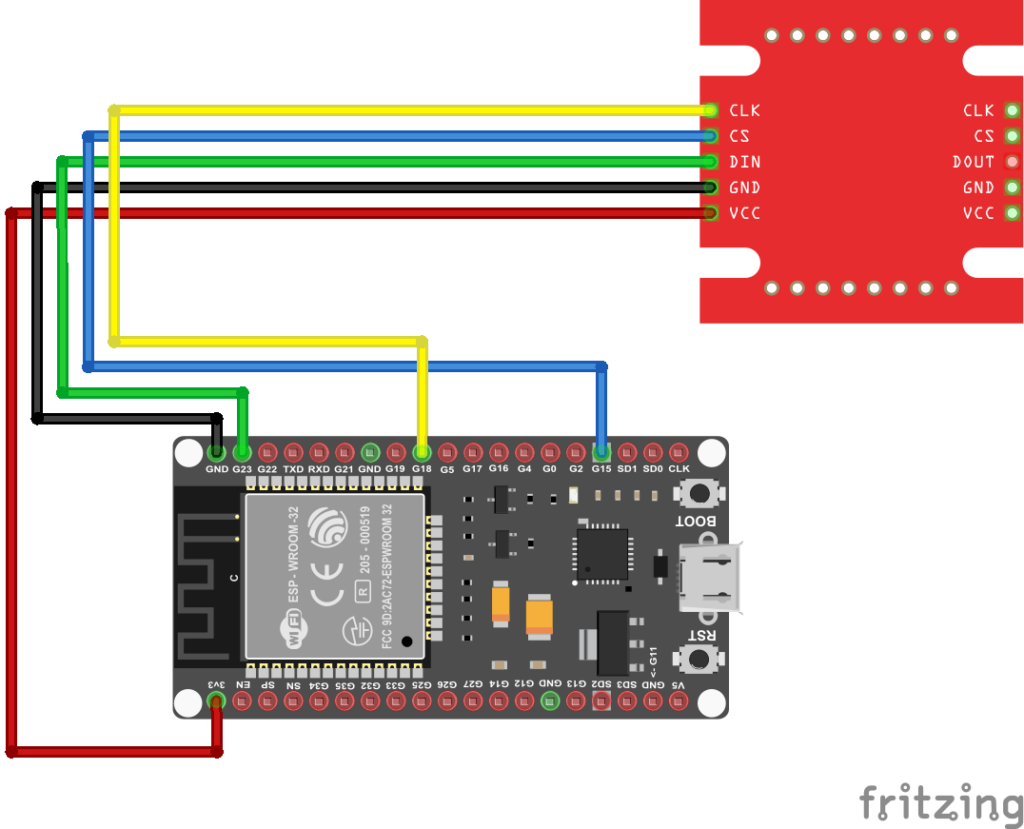
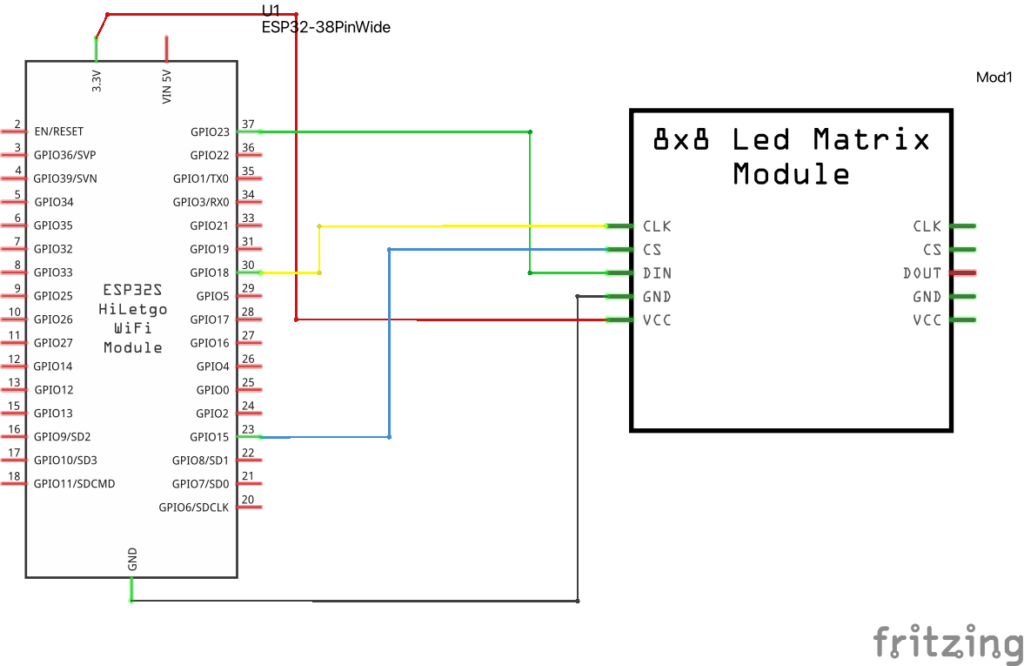
各接続する場所を表でまとめました。確認してください。
| MAX7219LED | ESP32 |
| CLK | GPIO 18 |
| CS | GPIO 15 |
| DIN | GPIO 23 |
| GND | GND |
| VCC | 3.3V |
プログラムを書き込む
回路を作ることができたのでプログラムを書き込んでいきます。サンプルプログラムを元にESP32用に変更しました。
テキストを表示
まず、テキストを表示するプログラムを紹介します。
#include <LEDMatrixDriver.hpp>

// This sketch draw marquee text on your LED matrix using the hardware SPI driver Library by Bartosz Bielawski.
// Example written 16.06.2017 by Marko Oette, www.oette.info

// Define the ChipSelect pin for the led matrix (Dont use the SS or MISO pin of your Arduino!)
// Other pins are Arduino specific SPI pins (MOSI=DIN, SCK=CLK of the LEDMatrix) see https://www.arduino.cc/en/Reference/SPI
const uint8_t LEDMATRIX_CS_PIN = 15; //ピン番号を設定

// Number of 8x8 segments you are connecting
const int LEDMATRIX_SEGMENTS = 4;
const int LEDMATRIX_WIDTH    = LEDMATRIX_SEGMENTS * 8;

// The LEDMatrixDriver class instance
LEDMatrixDriver lmd(LEDMATRIX_SEGMENTS, LEDMATRIX_CS_PIN);

// Marquee text
char text[] = "HELLO WORLD";

// Marquee speed (lower nubmers = faster)
const int ANIM_DELAY = 300;

void setup() {
  // init the display
  lmd.setEnabled(true);
  lmd.setIntensity(2);   // 0 = low, 10 = high
}

int x=0, y=0;   // start top left

// This is the font definition. You can use http://gurgleapps.com/tools/matrix to create your own font or sprites.
// If you like the font feel free to use it. I created it myself and donate it to the public domain.
byte font[95][8] = { {0,0,0,0,0,0,0,0}, // SPACE
                     {0x10,0x18,0x18,0x18,0x18,0x00,0x18,0x18}, // EXCL
                     {0x28,0x28,0x08,0x00,0x00,0x00,0x00,0x00}, // QUOT
                     {0x00,0x0a,0x7f,0x14,0x28,0xfe,0x50,0x00}, // #
                     {0x10,0x38,0x54,0x70,0x1c,0x54,0x38,0x10}, // $
                     {0x00,0x60,0x66,0x08,0x10,0x66,0x06,0x00}, // %
                     {0,0,0,0,0,0,0,0}, // &
                     {0x00,0x10,0x18,0x18,0x08,0x00,0x00,0x00}, // '
                     {0x02,0x04,0x08,0x08,0x08,0x08,0x08,0x04}, // (
                     {0x40,0x20,0x10,0x10,0x10,0x10,0x10,0x20}, // )
                     {0x00,0x10,0x54,0x38,0x10,0x38,0x54,0x10}, // *
                     {0x00,0x08,0x08,0x08,0x7f,0x08,0x08,0x08}, // +
                     {0x00,0x00,0x00,0x00,0x00,0x18,0x18,0x08}, // COMMA
                     {0x00,0x00,0x00,0x00,0x7e,0x00,0x00,0x00}, // -
                     {0x00,0x00,0x00,0x00,0x00,0x00,0x06,0x06}, // DOT
                     {0x00,0x04,0x04,0x08,0x10,0x20,0x40,0x40}, // /
                     {0x00,0x38,0x44,0x4c,0x54,0x64,0x44,0x38}, // 0
                     {0x04,0x0c,0x14,0x24,0x04,0x04,0x04,0x04}, // 1
                     {0x00,0x30,0x48,0x04,0x04,0x38,0x40,0x7c}, // 2
                     {0x00,0x38,0x04,0x04,0x18,0x04,0x44,0x38}, // 3
                     {0x00,0x04,0x0c,0x14,0x24,0x7e,0x04,0x04}, // 4
                     {0x00,0x7c,0x40,0x40,0x78,0x04,0x04,0x38}, // 5
                     {0x00,0x38,0x40,0x40,0x78,0x44,0x44,0x38}, // 6
                     {0x00,0x7c,0x04,0x04,0x08,0x08,0x10,0x10}, // 7
                     {0x00,0x3c,0x44,0x44,0x38,0x44,0x44,0x78}, // 8
                     {0x00,0x38,0x44,0x44,0x3c,0x04,0x04,0x78}, // 9
                     {0x00,0x18,0x18,0x00,0x00,0x18,0x18,0x00}, // :
                     {0x00,0x18,0x18,0x00,0x00,0x18,0x18,0x08}, // ;
                     {0x00,0x10,0x20,0x40,0x80,0x40,0x20,0x10}, // <
                     {0x00,0x00,0x7e,0x00,0x00,0xfc,0x00,0x00}, // =
                     {0x00,0x08,0x04,0x02,0x01,0x02,0x04,0x08}, // >
                     {0x00,0x38,0x44,0x04,0x08,0x10,0x00,0x10}, // ?
                     {0x00,0x30,0x48,0xba,0xba,0x84,0x78,0x00}, // @
                     {0x00,0x1c,0x22,0x42,0x42,0x7e,0x42,0x42}, // A
                     {0x00,0x78,0x44,0x44,0x78,0x44,0x44,0x7c}, // B
                     {0x00,0x3c,0x44,0x40,0x40,0x40,0x44,0x7c}, // C
                     {0x00,0x7c,0x42,0x42,0x42,0x42,0x44,0x78}, // D
                     {0x00,0x78,0x40,0x40,0x70,0x40,0x40,0x7c}, // E
                     {0x00,0x7c,0x40,0x40,0x78,0x40,0x40,0x40}, // F
                     {0x00,0x3c,0x40,0x40,0x5c,0x44,0x44,0x78}, // G
                     {0x00,0x42,0x42,0x42,0x7e,0x42,0x42,0x42}, // H
                     {0x00,0x7c,0x10,0x10,0x10,0x10,0x10,0x7e}, // I
                     {0x00,0x7e,0x02,0x02,0x02,0x02,0x04,0x38}, // J
                     {0x00,0x44,0x48,0x50,0x60,0x50,0x48,0x44}, // K
                     {0x00,0x40,0x40,0x40,0x40,0x40,0x40,0x7c}, // L
                     {0x00,0x82,0xc6,0xaa,0x92,0x82,0x82,0x82}, // M
                     {0x00,0x42,0x42,0x62,0x52,0x4a,0x46,0x42}, // N
                     {0x00,0x3c,0x42,0x42,0x42,0x42,0x44,0x38}, // O
                     {0x00,0x78,0x44,0x44,0x48,0x70,0x40,0x40}, // P
                     {0x00,0x3c,0x42,0x42,0x52,0x4a,0x44,0x3a}, // Q
                     {0x00,0x78,0x44,0x44,0x78,0x50,0x48,0x44}, // R
                     {0x00,0x38,0x40,0x40,0x38,0x04,0x04,0x78}, // S
                     {0x00,0x7e,0x90,0x10,0x10,0x10,0x10,0x10}, // T
                     {0x00,0x42,0x42,0x42,0x42,0x42,0x42,0x3e}, // U
                     {0x00,0x42,0x42,0x42,0x42,0x44,0x28,0x10}, // V
                     {0x80,0x82,0x82,0x92,0x92,0x92,0x94,0x78}, // W
                     {0x00,0x42,0x42,0x24,0x18,0x24,0x42,0x42}, // X
                     {0x00,0x44,0x44,0x28,0x10,0x10,0x10,0x10}, // Y
                     {0x00,0x7c,0x04,0x08,0x7c,0x20,0x40,0xfe}, // Z
                      // (the font does not contain any lower case letters. you can add your own.)
                  };    // {}, //


void loop()
{
	// Draw the text to the current position
	int len = strlen(text);
	drawString(text, len, x, 0);
	// In case you wonder why we don't have to call lmd.clear() in every loop: The font has a opaque (black) background...

	// Toggle display of the new framebuffer
	lmd.display();

	// Wait to let the human read the display
	delay(ANIM_DELAY);

	// Advance to next coordinate
	if( --x < len * -8 ) {
		x = LEDMATRIX_WIDTH;
	}
}


/**
 * This function draws a string of the given length to the given position.
 */
void drawString(char* text, int len, int x, int y )
{
  for( int idx = 0; idx < len; idx ++ )
  {
    int c = text[idx] - 32;

    // stop if char is outside visible area
    if( x + idx * 8  > LEDMATRIX_WIDTH )
      return;

    // only draw if char is visible
    if( 8 + x + idx * 8 > 0 )
      drawSprite( font[c], x + idx * 8, y, 8, 8 );
  }
}

/**
 * This draws a sprite to the given position using the width and height supplied (usually 8x8)
 */
void drawSprite( byte* sprite, int x, int y, int width, int height )
{
  // The mask is used to get the column bit from the sprite row
  byte mask = B10000000;

  for( int iy = 0; iy < height; iy++ )
  {
    for( int ix = 0; ix < width; ix++ )
    {
      lmd.setPixel(x + ix, y + iy, (bool)(sprite[iy] & mask ));

      // shift the mask by one pixel to the right
      mask = mask >> 1;
    }

    // reset column mask
    mask = B10000000;
  }
}
このプログラムを実行すると「HELLO WORLD」と表示されると思います。違う文字を表示するには赤マーカーの部分を変更することで変える事ができます。
また、黄色のマーカーの部分を変更することで流れるスピードを変更することができます。数字が小さくなると流れるスピードが早くなり、大きくなると遅くなります。
模様を表示
模様を表示するプログラムを紹介します。
模様をコードに変換してくれるサイトを使ってコードを生成します。まずサイトにアクセスします。
LED Matrix Tool
GurgleApps.com
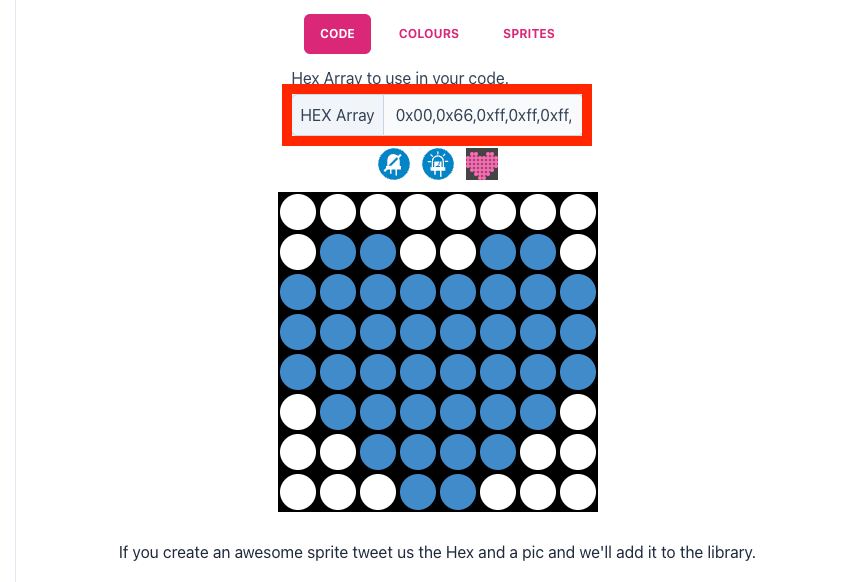
そして模様を作成します。青色はON、白色はOFFになります。
完成したら、「HEX Array」ないのコードをコピーします。
コピーしたコードを赤マーカーの部分に貼り付けます。
#include <LEDMatrixDriver.hpp>

// This sketch draw marquee text on your LED matrix using the hardware SPI driver Library by Bartosz Bielawski.
// Example written 16.06.2017 by Marko Oette, www.oette.info

// Define the ChipSelect pin for the led matrix (Dont use the SS or MISO pin of your Arduino!)
// Other pins are Arduino specific SPI pins (MOSI=DIN, SCK=CLK of the LEDMatrix) see https://www.arduino.cc/en/Reference/SPI
const uint8_t LEDMATRIX_CS_PIN = 15;

// Number of 8x8 segments you are connecting
const int LEDMATRIX_SEGMENTS = 4;
const int LEDMATRIX_WIDTH    = LEDMATRIX_SEGMENTS * 8;

// The LEDMatrixDriver class instance
LEDMatrixDriver lmd(LEDMATRIX_SEGMENTS, LEDMATRIX_CS_PIN);

// Marquee text
char text[] = "** LED MATRIX DEMO! ** (1234567890) ++ \"ABCDEFGHIJKLMNOPQRSTUVWXYZ\" ++ <$%/=?'.@,> --";

// Marquee speed (lower nubmers = faster)
const int ANIM_DELAY = 300;

void setup() {
  // init the display
  lmd.setEnabled(true);
  lmd.setIntensity(2);   // 0 = low, 10 = high
}

int x=0, y=0;   // start top left

// This is the font definition. You can use http://gurgleapps.com/tools/matrix to create your own font or sprites.
// If you like the font feel free to use it. I created it myself and donate it to the public domain.
byte font[95][8] = { 0x00,0x66,0xff,0xff,0xff,0x7e,0x3c,0x18 };

↓↓↓省略↓↓↓
黄色のマーカーの部分を変更することで流れるスピードを変更することができます。数字が小さくなると流れるスピードが早くなり、大きくなると遅くなります。
まとめ
今回はLEDマトリクスの使い方を紹介しました。
サンプルプログラムのおかげで変更箇所が少なく初心者でも簡単に実行できるのでぜひ試してみてください。


コメント