「Stable Diffusion web UI」を使いたいけど
・AIで画像を生成したいけどGPUを持っていない
・古いパソコンでも動かしたい
・ローカル環境で試してみたい
という理由であきらめることが多いです。
私もGPUは持っているのですが古すぎてドライバーがサポート外で使えませんでした。
今回はこのようなGPUがない環境でも「Stable Diffusion web UI」を動かす方法を紹介します。
環境
今回試した環境を紹介します。
| 項目 | 型番 |
| OS | Ubuntu 22.04 |
| CPU | Intel i7 3770K |
| メモリ | DDR3 16GB |
デスクトップぽそこんにUbuntuOSをインストールして動かしています。
仮想マシンでも動作するとは思いますが画像生成の時にCPUをたくさん使うので実機で動かすことをお勧めします。
Stable Diffusion web UIのセットアップ
「Stable Diffusion web UI」を動作するようにセットアップしていきます。詳細は、「Stable Diffusion web UI」のGiHubをご覧ください。
まず、依存するソフトウェアをインストールします。
$ sudo apt install wget git nano python3 python3-venv python3-pipファイルをダウンロードします。GitHubからクローンします。
$ git clone https://github.com/AUTOMATIC1111/stable-diffusion-webui.gitクローン出来たらディレクトリを移動します。
$ cd stable-diffusion-webui設定ファイルを変更(重要!)
設定ファイルを変更します。
今のままでは「GPU」を使う設定になっているので「CPU」を使うように変更します。
nanoエディターでファイルを編集します。
$ sudo nano launch.py225行目ぐらいに以下のコードがあります。(検索を使って見つけてください。)
コードの黄色マーカ部分を編集します。
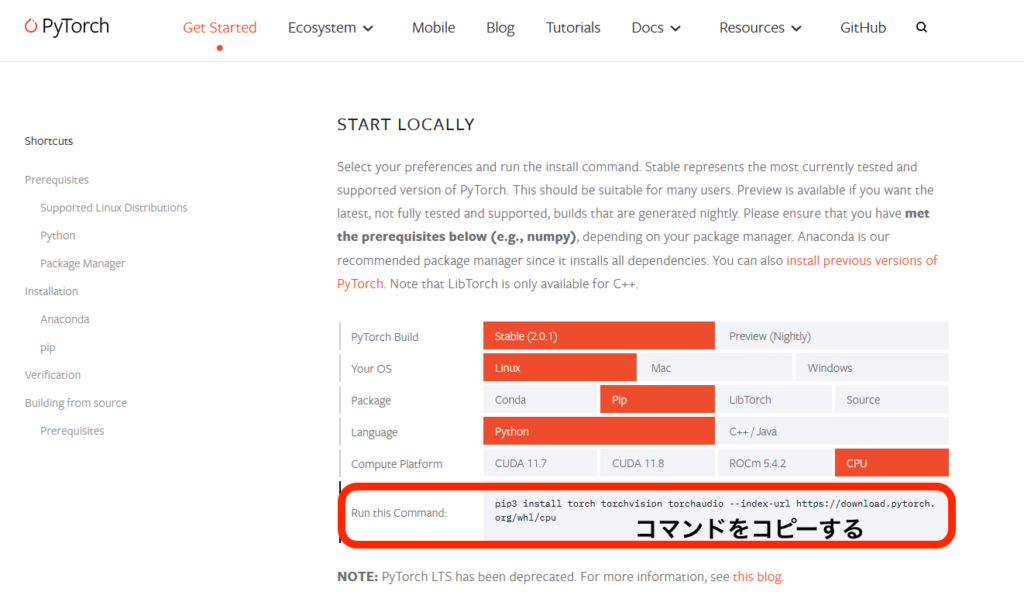
torch_command = os.environ.get('TORCH_COMMAND', "pip install torch==2.0.0 torchvision==0.15.1 --extra-index-url https://download.pytorch.org/whl/cu118")マーカ部分を以下のサイトを参考に書き換えます。

サイトにアクセスすると色々項目がでてくるので下の画像みたいに選択し、コマンドをコピーします。

先程コピーしたコマンドを貼り付けます。
変更後です。↓
torch_command = os.environ.get('TORCH_COMMAND', "pip install torch torchvision torchaudio --index-url https://download.pytorch.org/whl/cpu")変更したら保存します。
モデルデータをダウンロード
「Stable Diffusion web UI」を使うにはモデルデータをダウンロードする必要があります。モデルデータはたくさんあるので自分の気に入ったものを見つけてください。今回は「anyting-v4.0」を使います。

モデルデータをディレクトリにダウンロードします。
$ cd ~/stable-diffusion-webui/models/Stable-diffusion
$ wget [モデルのURL]
実行
「Stable Diffusion web UI」を実行していきます。
まず、ディレクトリを移動します。
$ cd ~/stable-diffusion-webui実行ファイルの権限を変更します。
$ sudo chmod +x webui.sh最後に以下のコマンドを実行します。
$ ./webui.sh --skip-torch-cuda-test --precision full --no-half --listen以下は実行したときのログです。黄色マーカの部分(IPアドレス)が表示されたら起動ができています。
################################################################
Install script for stable-diffusion + Web UI
Tested on Debian 11 (Bullseye)
################################################################

################################################################
Running on remylog user
################################################################

################################################################
Repo already cloned, using it as install directory
################################################################

################################################################
Create and activate python venv
################################################################

################################################################
Launching launch.py...
################################################################
Cannot locate TCMalloc (improves CPU memory usage)
Python 3.10.6 (main, Mar 10 2023, 10:55:28) [GCC 11.3.0]
Commit hash: ca10f5e186659affd75dadb70eab1f7bfb92691f
Installing requirements
Launching Web UI with arguments: --skip-torch-cuda-test --precision full --no-half --listen
/home/remylog/stable-diffusion-webui-master-cpu/venv/lib/python3.10/site-packages/torch/cuda/__init__.py:88: UserWarning: HIP initialization: Unexpected error from hipGetDeviceCount(). Did you run some cuda functions before calling NumHipDevices() that might have already set an error? Error 101: hipErrorInvalidDevice (Triggered internally at ../c10/hip/HIPFunctions.cpp:110.)
  return torch._C._cuda_getDeviceCount() > 0
Warning: caught exception 'Unexpected error from hipGetDeviceCount(). Did you run some cuda functions before calling NumHipDevices() that might have already set an error? Error 101: hipErrorInvalidDevice', memory monitor disabled
No module 'xformers'. Proceeding without it.
==============================================================================
You are running torch 1.13.1+rocm5.2.
The program is tested to work with torch 2.0.0.
To reinstall the desired version, run with commandline flag --reinstall-torch.
Beware that this will cause a lot of large files to be downloaded, as well as
there are reports of issues with training tab on the latest version.

Use --skip-version-check commandline argument to disable this check.
==============================================================================
Calculating sha256 for /home/remylog/stable-diffusion-webui-master-cpu/models/Stable-diffusion/anything-v4.5.ckpt: fbcf965a62d9d82e935d3d17e97522c29f44550aa9e120a6886f19b578521ec5
Loading weights [fbcf965a62] from /home/remylog/stable-diffusion-webui-master-cpu/models/Stable-diffusion/anything-v4.5.ckpt
Creating model from config: /home/remylog/stable-diffusion-webui-master-cpu/configs/v1-inference.yaml
LatentDiffusion: Running in eps-prediction mode
DiffusionWrapper has 859.52 M params.
Applying cross attention optimization (InvokeAI).
Textual inversion embeddings loaded(0):
Model loaded in 29.7s (calculate hash: 20.5s, load weights from disk: 7.2s, create model: 0.9s, apply weights to model: 1.0s).
Running on local URL:  http://0.0.0.0:7860

To create a public link, set `share=True` in `launch()`.
Startup time: 35.3s (import torch: 1.7s, import gradio: 1.2s, import ldm: 0.6s, other imports: 0.9s, setup codeformer: 0.2s, load scripts: 0.4s, load SD checkpoint: 29.8s, create ui: 0.3s, gradio launch: 0.1s).
Stable Diffusion web UI にアクセス
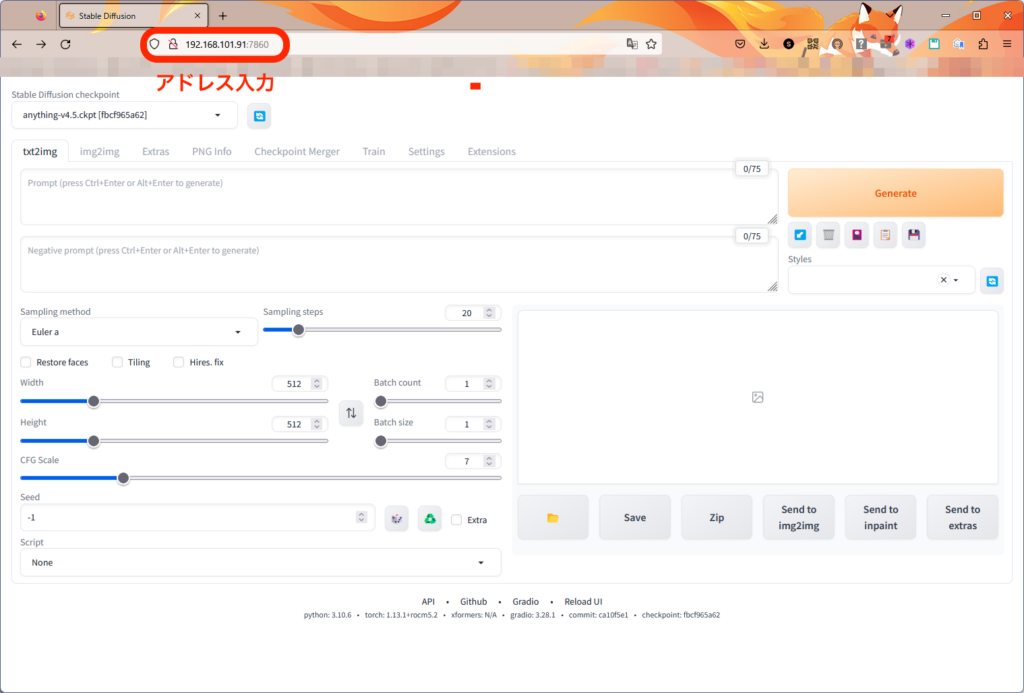
無事起動ができたので「Stable Diffusion web UI」にアクセスします。
ブラウザを起動し、URLを入力します。
http://[サーバのIPアドレス]:7860サイトにアクセスすると以下のようなUIが表示されます。

まとめ
今回は、GPUがなくても「Stable Diffusion web UI 」を動かす方法を紹介しました。CPU演算なので画像完成までにかなり時間はかかりますが試すにはちょうどいいです。


コメント